
¡Hola!
Hoy os traigo un tutorial apto para vagos y para gente con poco tiempo: THE LAZY QUILT.
Today I bring you a tutorial suitable for lazy people and those with little time: THE LAZY QUILT.

Es tan fácil que me da hasta vergüenza explicaros mi secreto... pero hay veces que simplemente quieres chasquear los dedos y que algo aparezca como por arte de magia. Y con este quilt o colcha pues se consigue.
NOTA: no uso magia.
It's so easy that I'm almost embarrassed to explain my secret to you... but there are times when you just want to snap your fingers and have something appear as if by magic. And with this quilt, that's exactly what happens.
NOTE: I don't use magic.
Voy a colocar fotos para que pueda entenderse mejor el proceso, pero ya os digo que es tremendamente fácil.
Necesitaréis:
Retales de telas de los estampados o colores que más os gusten o se adecúen a lo que necesitáis
Entretela que tenga un lado adhesivo (con la plancha se queda pegado)
Un pos-it cuadrado (yo lo he doblado hasta obtener un cuarto del post-it) como patrón
Plancha
Papel de horno
Máquina de coser (para que sea más rápido) o aguja e hilo.
I'm going to post pictures to help you understand the process better, but I'll tell you right now that it's incredibly easy.
You will need:
Fabric scraps with prints or colors that you like or that suit your needs.
Fusible interfacing (with adhesive side for ironing).
A square post-it note (I folded it to get a quarter of the post-it) as a template.
Iron.
Parchment paper.
Sewing machine (for faster results) or needle and thread.
Yo he preparado 35 cuadrados repartidos en 6 filas y 5 columnas. I have prepared 35 squares arranged in 6 rows and 5 columns.
Los he ido colocando estratégicamente para que se vean bien, con cuidado de no poner el mismo patrón seguido, encima de un trozo de entretela, por el lado adhesivo. I've been strategically placing them to look good, making sure not to put the same pattern next to each other, on top of a piece of interfacing, adhesive side down.
Habiendo recortado el sobrante y colocado un papel de horno por encima y he dado calor con la plancha y los cuadrados se han pegado a la entretela. After trimming the excess and placing parchment paper on top, I applied heat with the iron, and the squares adhered to the interfacing.


4. Después con cuidado he empezado por coser a máquina los cuadrados. ¿Cómo? Doblando las tiras pegadas:
Afterwards, I carefully started sewing the squares together using a sewing machine. How? By folding the attached strips:

Y así con todas las columnas (o filas). Deberéis escoger cuáles hacer primero.
And so on with all the columns (or rows). You should choose which ones to do first.
5. Abrid con unas tijeras las dobleces y planchad para separar bien.
Open the folds with scissors and iron to separate them properly.


6. Ahora haced lo mismo con las otras tiras perpendiculares.
Now do the same with the other perpendicular strips.


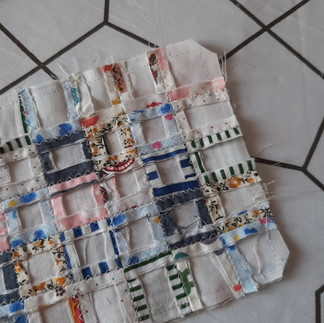
7. Os deberá quedar algo así:
You should end up with something like this:

¡Una planchadita más!
One more press with the iron!
Es normal que los cuadrados de los contornos estén más estirados, eso va a ser el margen de costura para unir esta parte a la trasera.
It's normal for the squares on the edges to be more stretched out; that will serve as the seam allowance for attaching this part to the back.
8. Cortamos una tela para la parte posterior de nuestra colcha.
En este punto he decidido meterle un zigzag por encima de las costuras...
We cut a piece of fabric for the back of our quilt.
At this point, I've decided to add a zigzag stitch over the seams...

9. Cosed derecho con derecho.
¡ACUÉRDATE DE DEJAR UN HUECO PARA DAR LA VUELTA A LA COLCHA!
Sew right sides together.
REMEMBER TO LEAVE AN OPENING TO TURN THE QUILT INSIDE OUT!


10. Resultado final:
Final result:

Espero que os haya gustado :)
Un beso
I hope you liked it :)
Best wishes,
Sandra